
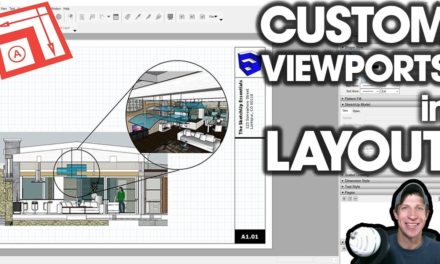
3D CONSTRUCTION DETAILS IN LAYOUT with Clipping Masks
Learn to create a construction plan in Layout from your SketchUp model showing enlarged 3D construction details. In this tutorial, we’ll discuss how to use clipping masks in Layout to adjust the way your details look within your construction drawings.
Do you like these SketchUp tutorials and videos?
If so, please consider supporting me on Patreon (click here to support) or by visiting my Support the Show Page!
THE SKETCHUP ESSENTIALS COURSE
http://www.thesketchupessentials.com/course
CLIPPING MASKS VIDEO LINK
https://www.youtube.com/watch?v=Da8xbZRy9os
SKETCHUP CLIPPING MASKS VIDEO
https://www.youtube.com/watch?v=Da8xbZRy9os
SKETCHUP NICK SONDER CONSTRUCTION DETAILS VIDEO
https://www.youtube.com/watch?v=iTKmwiTEdQ8
BUILDING BUNDLE LINK (Affiliate Link)
http://www.thesketchupessentials.com/buildingbundle
IMI MASONRY DETAIL MODEL
https://3dwarehouse.sketchup.com/model/ud13f8c64-a589-44a8-9eb5-e7a0822c0958/Masonry-Wall-Cap-Filled-Cavity
In this video, I’m going to show you how to use clipping masks to create an enlarged detail of a wall in Layout.
In this case, what I want to do is use a separate detail in order to show how something is built without having to actually model a wall detailed in this manner.
Basically, what we’re going to do is create two viewports within Layout – one containing our building model, then another showing our enlarged detail. There’s two ways to do this – we can place our detail model within our SketchUp model, or we can add it to a separate model for details, then add a viewport to that model within Layout instead.
We’ll start by adding a viewport within our building model – this will be the view that we want to bring in to our Layout model.
Then, save your model and send it to Layout.
Go ahead and size your model to what you want. You can use a clipping mask to show only the part of the model you’d like to show.
Now, let’s bring in our detail model. Start by creating a view within your detail model, then creating a new viewport within your Layout model.
Move this around within your model to where you’d like it to be. Now you can use the drawing tools within SketchUp to create an annotation, in this case a circular annotation over your wall, then draw another circle over your detail model. We can then use this to create a clipping mask, allowing you to match the shape and style of the annotation on your wall model.
You could also use this method to show multiple details for one wall assembly.
I’m also going to link to a video from SketchUp with Nick Sonder where he talks about how he creates his construction details within SketchUp – he’s truly a master in creating artistic, useful construction documents.
About Justin Geis
Hi, I'm Justin Geis, and I'm the founder of The SketchUp Essentials. I started using SketchUp as part of my work as a general contractor in 2008. I quickly realized the power of the software and started using it for personal projects. I started The SketchUp Essentials as a place to share easy to follow SketchUp tutorials and tips to help everyone harness the power of 3D Modeling in their lives. When not working with SketchUp, I enjoy playing soccer and spending time with my wife and our two dogs.