
Creating Organic Models with Curviloft Step by Step – SketchUp Plugin Tutorials
Do you like these SketchUp tutorials and videos?
If so, please consider supporting me on Patreon (click here to support)!
DOWNLOAD CURVILOFT – https://extensions.sketchup.com/en/content/curviloft
In this video I wanted to talk just a bit more in-depth about some of the functions in Curviloft.
This is loosely based on an article on the SketchUp blog from a few years ago, but I wanted to get more in depth on some things, and spend a little more time on some different ideas. I believe this extension is one of the more important extensions for anything that does organic modeling to learn.
Curviloft is an organic modeling extension from Fredo6. It has a few different functions, but in general, it’s basically designed to help you create surfaces from lines.
It does this in a few ways. When you first install the extension, it will pop up 3 different options – loft by spline, loft by path, and skinning.
Loft by Spline
Loft by spline basically takes the profile of one shape and extrudes it so that it ends up as another shape.
For example – if I draw a hexagon and a 24 sided circle, select them both, and use loft by spline, curviloft will generate geometry merging the hexagon and the circle.
With curviloft active, you can see that there are a bunch of complicated options showing – it’s not as complicated as it looks, and there’s a bunch of trial and error involved, which is fine. There’s a series of options adjusting the way that the curves are created that you can select.
One of the cool things that you can do with this function is by clicking on one of the junction areas, you can set a twist, meaning you can create twisting shapes with the loft by spline tool.
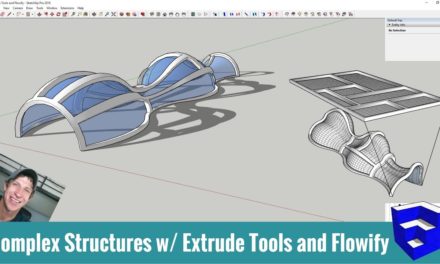
Once you learn to use the loft by spline tool, you can start using it to create incredible shapes.
Loft Along Path
I’m not going to talk too much about the loft along path tool, other than to say that you can do something similar to the loft by spline tool, but you can dictate the path that the loft follows.
Skinning Tool
Finally, I want to talk about my personal favorite – the skinning tool!
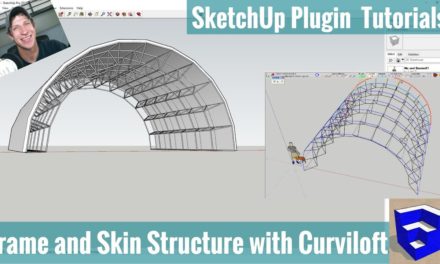
The skinning tool is a tool that will actually generate a skin over a framework of lines. You can use this to create everything from tensile structures to cool curving shapes.
Basically the way this tool works is you draw a frame, then activate the tool to draw a skin across it. It seems to do this by mathematically drawing segments within objects.
For example – I can draw this series of arcs to the center of a circle, then use the skinning tool to draw a face along them.
About Justin Geis
Hi, I'm Justin Geis, and I'm the founder of The SketchUp Essentials. I started using SketchUp as part of my work as a general contractor in 2008. I quickly realized the power of the software and started using it for personal projects. I started The SketchUp Essentials as a place to share easy to follow SketchUp tutorials and tips to help everyone harness the power of 3D Modeling in their lives. When not working with SketchUp, I enjoy playing soccer and spending time with my wife and our two dogs.