
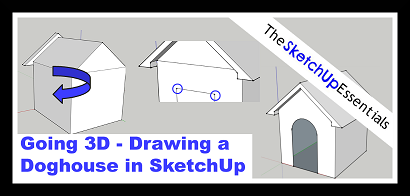
Going 3D – A SketchUp Tutorial for Drawing a Doghouse in SketchUp
 Now that we’ve gone through how to use the 2D drawing tools in SketchUp, let’s go ahead and use them to create a 3D model. Bonnie, Quincy and I had a staff meeting to discuss what would be a good model for the 3D modeling tutorial. They outvoted me, so the model that we’re going to do for this tutorial will be a doghouse.
Go ahead and create a new SketchUp model. Go ahead and click on the Sophie model to select her, then press delete on your keyboard. Now you’re left with an empty drawing area.
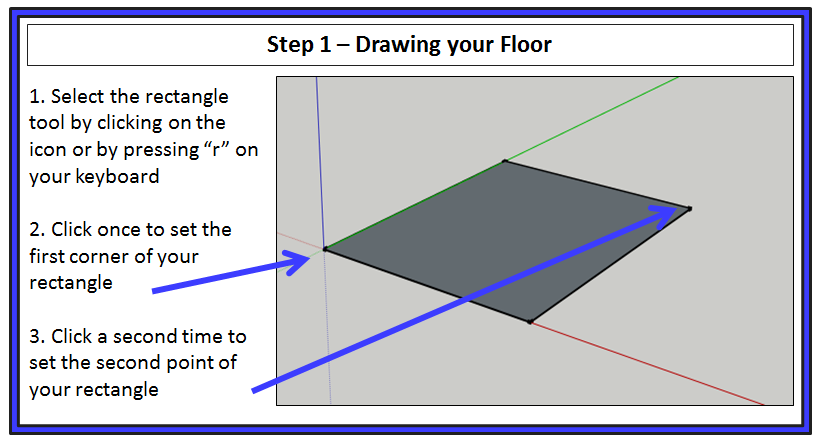
Start off by selecting the rectangle tool, either by clicking on it or by pressing the “r” key on your keyboard. Once you’ve done this, draw a rectangle. This will be the floor of our doghouse.
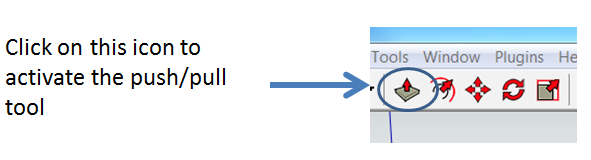
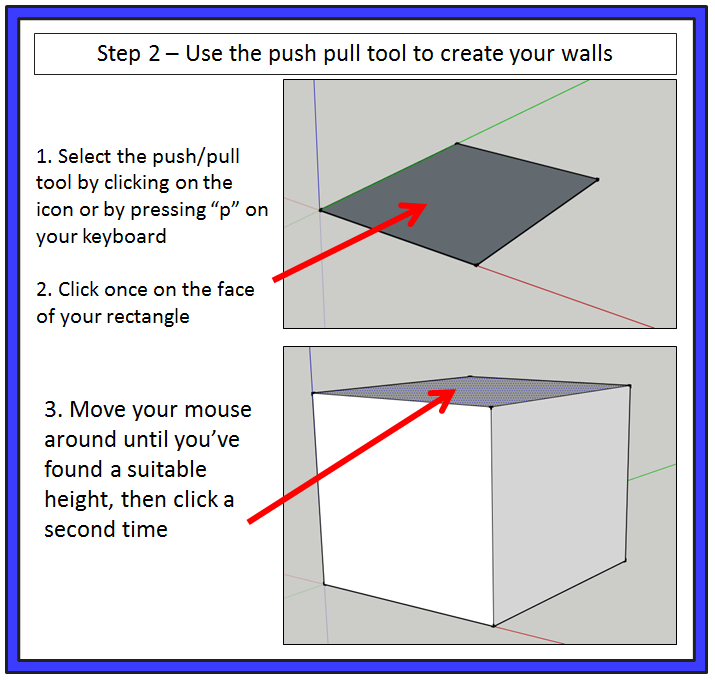
Now that you’ve drawn your floor, we’re going to use a new tool to create the walls of your doghouse. Look up in your toolbar and click on the icon that looks like a little square with an arrow coming out of the top of it. This is the push/pull tool.
Basically, what the push/pull tool does is it takes a face and gives it a 3rd dimension by creating volume. This is a very powerful, easy to use tool in SketchUp, and you’ll find yourself using it a lot to create 3D drawings from your 2D shapes.
What we’re going to do with this tool is use it to create the walls for our doghouse. Once you’ve activated the tool by clicking on it (or by using the keyboard shortcut “p”), click once on the face of your rectangle. This will activate push/pull mode. Move your mouse around and you’ll notice that SketchUp takes the face you’ve selected and turns it into a 3D box. Move your mouse to the height you’d like your doghouse to be, then click your mouse again.
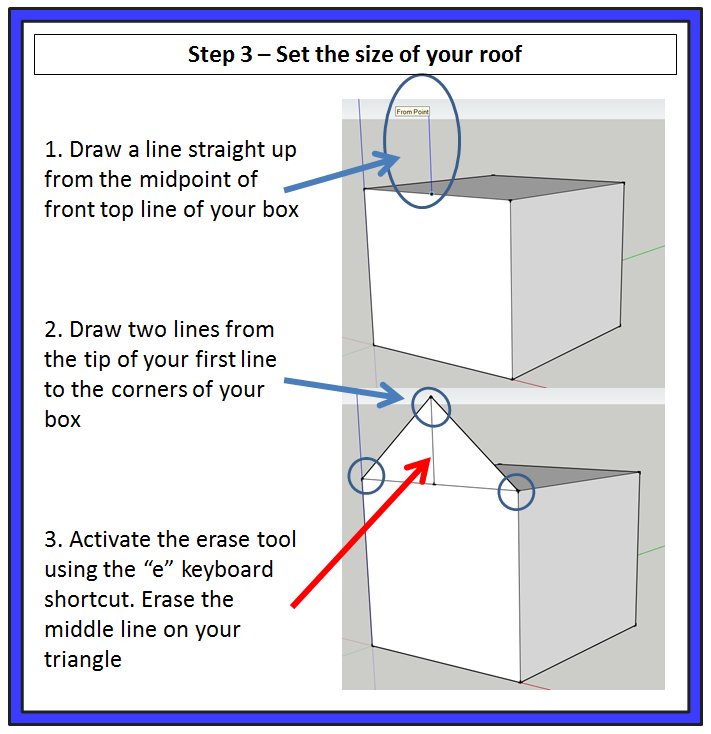
Now no self-respecting dog would live in a house with a flat roof, right? Let’s go ahead and create our sloped roof using the line tools and the push pull tool. Activate your line tool by using the “L” key on your keyboard (or by clicking on the little pencil icon above). Now move your cursor over the middle of the front line of the top of your box. What do you notice?
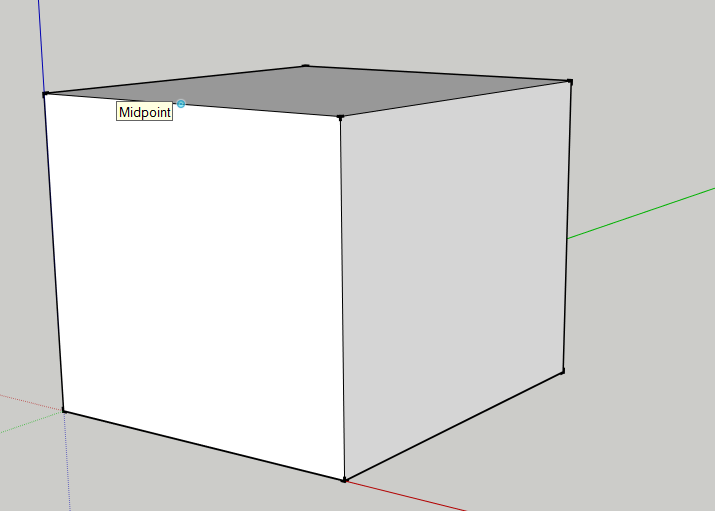
SketchUp shows you a little dot with the label “midpoint.” This is one of the powerful things about the inferences engine in SketchUp. It will automatically show you where the midpoints of lines are, so you don’t have to worry about centering things in your model. Now what we’re going to do is draw 3 lines to shape out our roof. Go ahead and draw a line from the midpoint shown above straight up. This will create the height of our roof. From the top of this line, draw two more lines from the tip of your line to the corners of your box (see image below). Finally, activate the eraser tool using the “e” key on your keyboard and erase the first vertical line you drew.
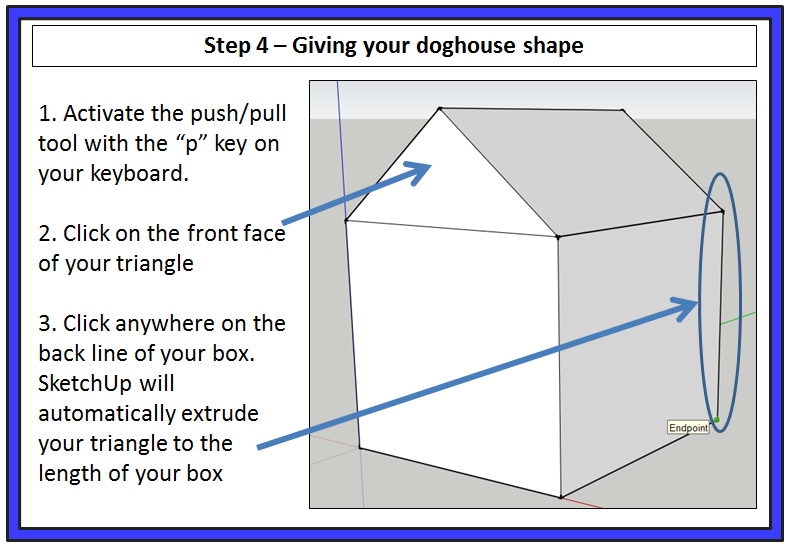
Now that you’ve done this, use the push/pull tool to make your triangular face the entire length of your box. Activate the push/pull tool (keyboard shortcut “p”) and click on the face of your triangle. This will allow you to extrude your shape forward and backward. Since we want to make this shape exactly the length of your box, you can click once on your face to activate the tool, then click again anywhere on the back line of your box and SketchUp will automatically make your new shape the length of the box.
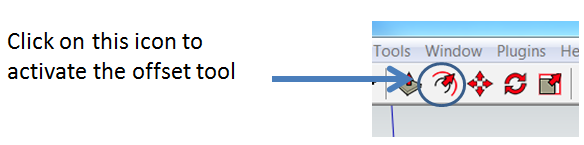
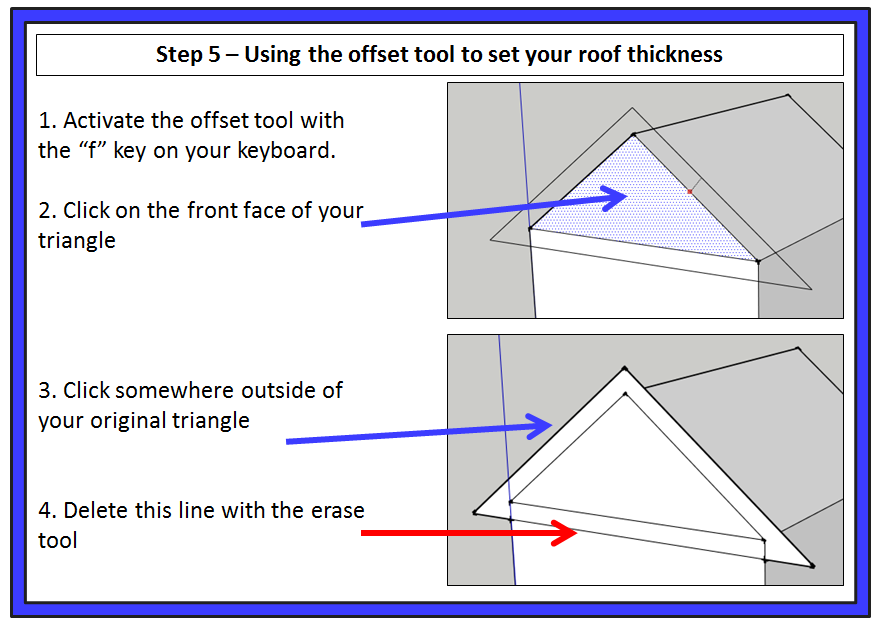
Now at this point, your doghouse has shape, but it’s definitely suffering from a lack of a respectable roof. We’re going to change this using the offset tool. The offset tool copies lines and faces at an equal distance around a shape. We’re going to use it to give our roof some thickness. To activate the offset tool, find the icon in your toolbar that looks like a pair of curves (one black and one red) with a diagonal red arrow coming out of them (or you can use the keyboard shortcut “f”).
Once the offset tool is active, hover your cursor over the front face of the triangle you just drew. The face will fill in with blue shading to indicate that this is the face the tool will select when you click. Go ahead and click inside the triangle, then move your cursor around. You’ll notice that SketchUp will draw another triangle around the inside or the outside of the triangle face you selected, depending on your cursor position. Go ahead and click outside this triangle to draw a bigger triangle outside of the smaller triangle you already drew. Finally, erase the bottom line of your new triangle that runs across the face of the front of your doghouse.
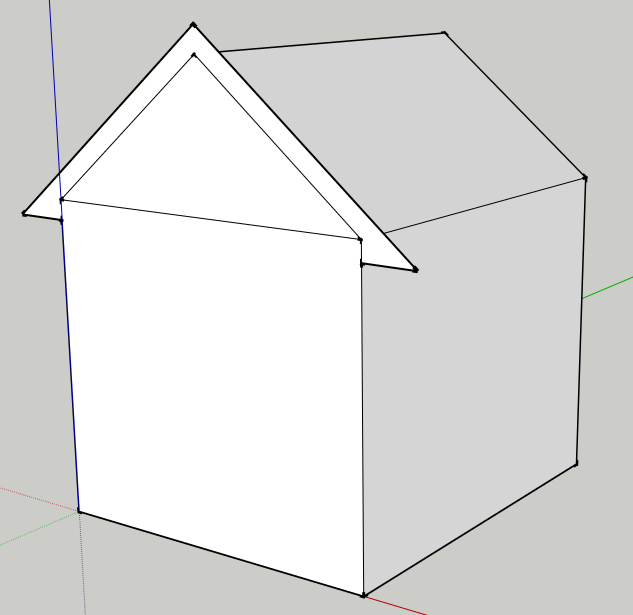
When you’re done, your model should look something like the following image.
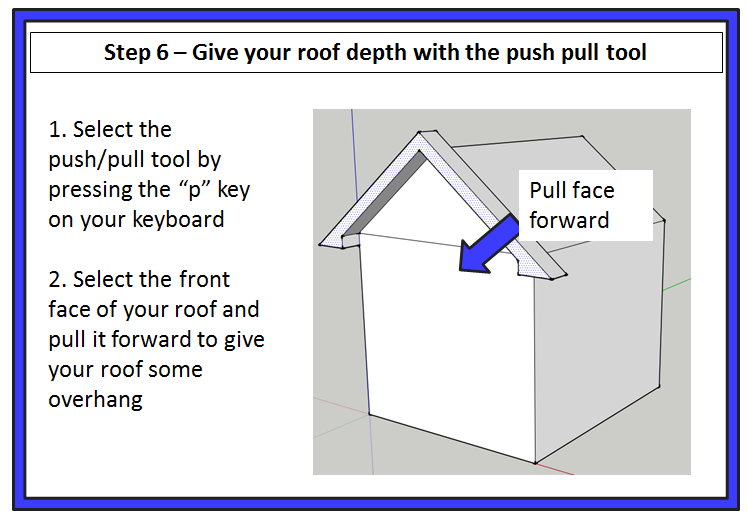
Now that we’ve set our roof thickness, we need to go ahead and give our roof some depth. We’re going to do this with the push/pull tool again. This will be a two-step process. Start by activating the push/pull tool and dragging the front of your roof forward a little bit. This will give us some roof overhang on the front of our doghouse.
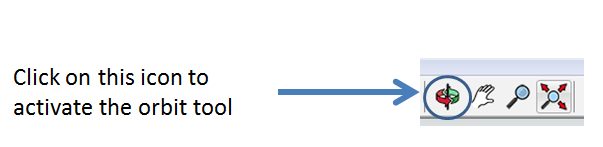
Now we need to see the back side of our doghouse, so use the orbit tool to rotate your view so you can see the back side of your model. We’ll discuss moving around in the model in more detail in a future post, but for now, you can access the orbit tool by clicking on the icon in your toolbar that looks like one red arrow and one green arrow going in a circle.
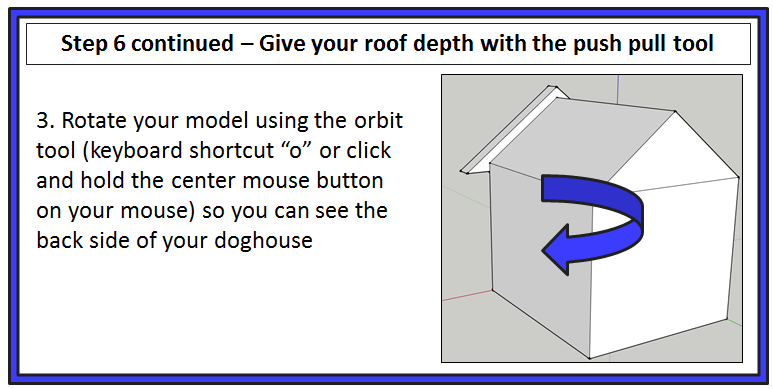
Once this tool is active, click and hold your left mouse button and move your cursor around the screen to move around in the model. When you want to stop orbiting, simply let up on the left mouse button. Go ahead and use the orbit tool to rotate your view so you can see the back of your doghouse
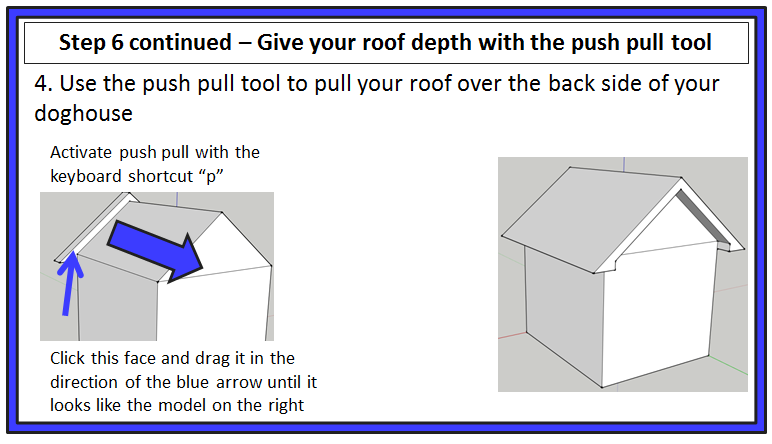
Now use the push/pull tool to pull the edge of your roof back past the back face of your doghouse so that it overhangs like the front.
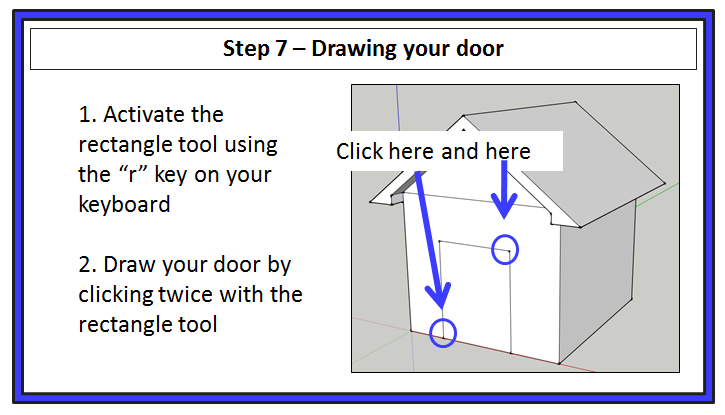
Finally, we’re going to create the door to the doghouse. Draw a rectangle using the rectangle tool to create the door width and height.
We could stop here, but no self-respecting stylish dog wants a boring rectangular door. They want a door with some style and some shape. To do this, we’re going to create a curved top for the door using the arc tool. Activate the arc tool by pressing the “a” key on your keyboard, then click on the two top corners of your door. This will set the length of your arc. Now click once somewhere up above the top of your door to set the bulge of your arc. Finally, use the erase key to delete the line separating your arc the rectangle below. SketchUp will automatically merge these two faces into a single face.
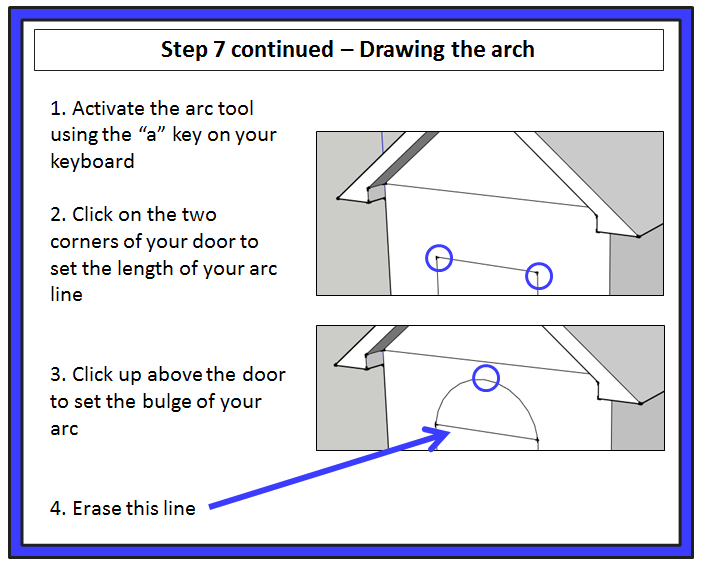
To finalize our doghouse, we’re going to do a little clean up. First off, use the erase tool to delete the horizontal line up above your arch.

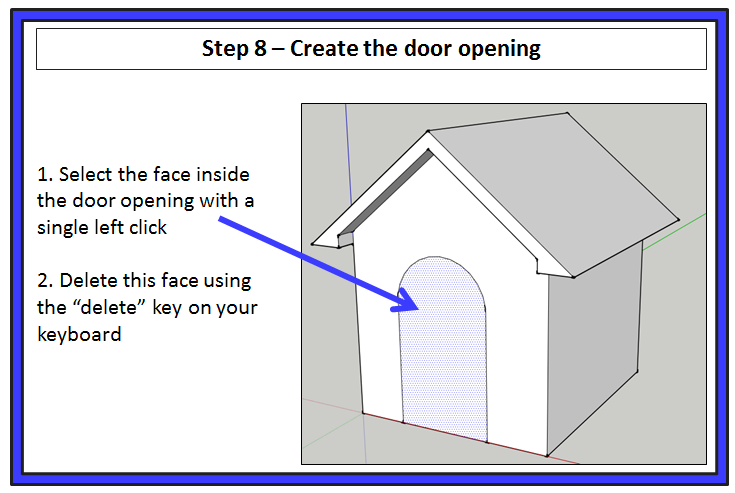
To create your door opening, we’ll need to delete the face inside of the opening outline so that there is an opening the dogs will actually be able to get into. To do this, select the face with a single left click. Then press the “delete” key on your keyboard. This will delete the face inside your door opening.
This will leave you a completed doghouse that looks like the image below. Bonnie appreciates your hard work in designing this house for her!

If you’re looking for more resources to help you develop your SketchUp skills, click here to check out the SketchUp tutorials section.
_________________________________________________________________________________________________________________
About Justin Geis
Hi, I'm Justin Geis, and I'm the founder of The SketchUp Essentials. I started using SketchUp as part of my work as a general contractor in 2008. I quickly realized the power of the software and started using it for personal projects. I started The SketchUp Essentials as a place to share easy to follow SketchUp tutorials and tips to help everyone harness the power of 3D Modeling in their lives. When not working with SketchUp, I enjoy playing soccer and spending time with my wife and our two dogs.