
 Now that we’ve gone through downloading and installing SketchUp, this tutorial will walk you through the basics of the user interface.
Quincy is going to come along for the ride on this one, so occasionally you’ll see little tips and tricks from him as well :).
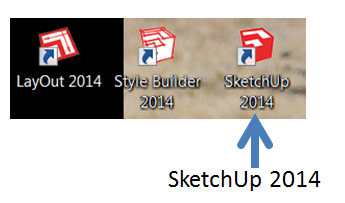
The first thing that you’re going to do is take a look at your desktop. Now that you’ve installed SketchUp on your computer, you should see three icons that look like this –
![]()
The first icon is for LayOut. This is a software that comes with the Pro Version of SketchUp. Layout is used to create more professional looking printouts from your models. It provides lots of options regarding visibility of lines, scales, etc. You get an eight hour trial of all of SketchUp’s Pro features whenever you download the free version, so you can try this software out.

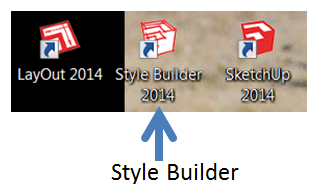 The second icon is for Style Builder. This is another software that comes with the Pro version of SketchUp. One of the cool things that you can do in SketchUp is apply different styles to your models. Basically what this means is that you can change the way your model looks to create different effects. There are styles that make your lines look more like pencil lines, or lines on a chalkboard, or sketches on a piece of textured paper. Style Builder is a tool that allows you to create your own styles for SketchUp. Like LayOut, you have eight hours to try out Style Builder when you download the free version of SketchUp.
Finally, the third icon is the icon for the actual SketchUp program itself. This is the icon we’re interested in right now. Double click the icon labeled “SketchUp 2014,” and let’s get started!
When you double click on the SketchUp 2014 icon, a window like the following will pop up –

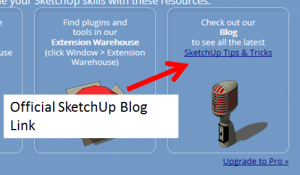 The default tab that opens up on this page is the “Learn” tab. This tab has some resources on it that can be helpful to you, particularly the link on the right that says “SketchUp Tips & Tricks.”
This link will take you to the official SketchUp blog’s tips and tricks section. However, this section doesn’t get updated nearly as often as the actual blog itself, so I recommend just visiting the main blog at http://www.sketchupdate.blogspot.com.
Check back often as this blog is updated with cool new SketchUp information all the time.
Notice that there are 2 more grey tabs on this page. The first one is labeled “License.” This tab allows you to manage your SketchUp Pro licenses. We’re not going to worry about this one right now.
The second tab is labeled “Template.” Click the little grey arrow next to the word “Template” to open this tab up. Once you do this, the window should look like the window below.

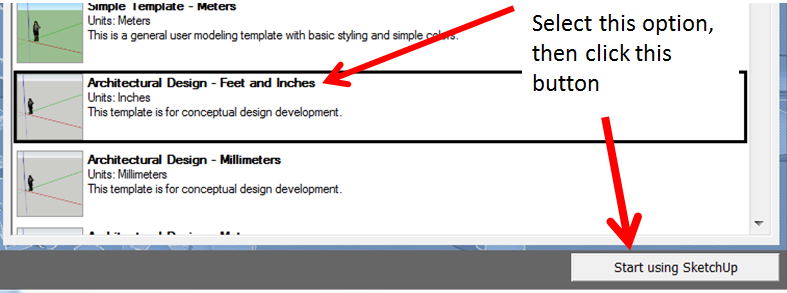
The template selection tab allows you to select some basic things about what your model will look like. These options include things like the units in your model (Meters, feet, etc) and the background of your model. These are all things that you can change later, but for now, select the “Architectural Design – Feet and Inches” option. Once you’ve done this, click the “Start using SketchUp” button.
Congratulations, you’ve created your first model!
This concludes part one of my SketchUp Navigation and User Interface Walkthrough tutorial. You can check out the next part of this tutorial here.
_________________________________________________________________________________________________________________
About Justin Geis
Hi, I'm Justin Geis, and I'm the founder of The SketchUp Essentials. I started using SketchUp as part of my work as a general contractor in 2008. I quickly realized the power of the software and started using it for personal projects. I started The SketchUp Essentials as a place to share easy to follow SketchUp tutorials and tips to help everyone harness the power of 3D Modeling in their lives. When not working with SketchUp, I enjoy playing soccer and spending time with my wife and our two dogs.